Guest User
Achieving an amazing depth of subject while shooting is not constantly easy. Do not throw your snapshots inside the trash. This academic will supply you with all of the keys to allow you to create a blurry location on your photographs.
The manipulate of the depth of field is something important within the success of a shooting. This makes it possible to isolate the challenge or to blur an unsightly history. If the most skilled photographers grasp it to the millimeter or even less (but hey, they have the system that is going with it too ...), this is away from being the case for everyone. Fortunately for us, photograph enhancing software allows you to do this pretty easily.
I specify that if we can add blur to an image, the opposite is unfortunately no longer feasible: a very blurry photograph can never be made very clear (see " the five limits of picture modifying software program ").
There are main techniques for artificially developing a shallow depth of the subject. Each of these strategies will permit you to edit a sort of image:
First case:the challenge is on one plane (that's the case of the image above). Indeed, as you can see, the space between the prayer wheels is particularly small (on the order of some centimeters). Creating a blurry place on this sort of photograph is then quite simple. In this case, you blur the entire photograph after which you observe a rectilinear gradient to the place to correspond to the sharp part of the image.
Second case:the situation to be detached from the decor isn't always at the equal aircraft (image under). This is, in particular, the case for snapshots in which the background is usually some meters away. In this case, the gradient can not be straight. It is, consequently, essential to isolate the principal difficulty before making use of the blur vicinity.
The implementation of those methods is described in both Photoshop Elements and Gimp software. You can also, if you wish, view the video academic at the lowest of this page.
1- The difficulty is at the identical aircraft as the location to be blurred.
But before editing this image, right here are some explanations at the technique that we will use. The principle, therefore, consists of creating a blurred picture that will be located over the sharp picture. The fuzzy picture will then be related to a layer mask (or mask layer in GIMP). The truth of creating a gradient on this fusion masks will make this place transparent and will, therefore, allow you to see what's at the layer underneath, particularly the sharp picture.
In a photograph, the vicinity around the blurring of sharpness is often pretty short. It will, therefore, be vital to create a customized gradient. So now let's examine the technique with the two software program:
With Photoshop Elements.
Open the photo to be edited after which create a replica of it on a brand new layer (Layer / Duplicate layer command…). The new layer is therefore observed above the original image.
Add layer masks to this new layer(Layer / Layer masks / Show all command). A white rectangle now appears to the right of your picture. You ought to then acquire a layer overlay as on the screenshot beneath.
Blur the photo this is connected to the fusion masks.To do so, click at the layer image (it's far then framed) then observe the More blurred filter (Filter / Blur command). Repeat this until you get the blur of your desire. For a finer adjustment, you could additionally use the Blur filter.
Select the black color through clicking on the two squares at the lowest of the device palette (the black square has to, consequently, be inside the foreground).
To create the gradient, select the Gradient device then click on on the Modify button at the top simply under the menu bar. Choose the Foreground -> obvious gradient then pass the small black square (1) to the fee of 50% (2). I endorse you to shop it by naming it (3) and clicking on new (4). It might be that much less to do to your next picture to retouch.
Select the fusion masks(the white square to the right of the photograph) through clicking on it. We are now ready to create the sharpness area.
Choose the Reflected Gradient icon (below the menu bar) and, whilst urgent the SHIFT key, draw a line by dragging and losing corresponding to half of the region you want to appear in the net. Indeed, as the call suggests, the gradient created will routinely reproduce at the opposite side to create something flawlessly symmetrical.
Photo modifying tip: through clicking on the small chain that connects the fusion mask to the layer, you may spoil the link and you'll be able to pass your fusion masks for your picture (it stays fixed). In our example, this is very sensible because it allows me to place the sharpness quarter very precisely (between the wood upright and the threshold of the prayer wheel).
The editing of this photograph is almost complete. All that stays is to blur the wooden structure (five) and to make the small piece of wood and the brink of the prayer wheel (6) clean.
To blur (5): choose the comb tool and the white coloration, go to the fusion mask then skip the comb over the vicinity to blur.
To make it clean (6): take the equal tool, pick the black color and bypass the comb over the areas to be sharpened.
With Gimp.
Blurred photo introduction:
Open the photo to be edited after which create a new layer (Layer / Duplicate layer command).
Add a layer maskto the layer you just created (Layer / Mask / Add a layer mask… command). Choose the “white (complete opacity)” option.
Creation of the personalized gradient:
Display the gradient window (Window menu / Dockable windows / Gradients) and pick the gradient "PP to Transparent". Right-click on this gradient then pick the option "Duplicate gradient".
Move the small white triangle to the left to shorten the transition sector among the obvious and the black. Do not forget to name your gradient.
Creation of the quarter of sharpness:
Select the "Bilinear" option (1) and set an offset to 50 (2) in the alternatives that appear underneath the toolbox.
Go to the layer mask then click and drag perpendicularly to create the area of sharpness.
Small finishing touches:
Take the brush tool then pick a circular brush. Go to the layer mask and paint the regions you need to make clean in black and those that should grow to be blurred in white.
2- The subject is on a distinct plane from the vicinity to be blurred.
Creating a blurred location is a piece more complicated because the gradient is not straight. Indeed, it could be necessary to apply the selection gear to isolate the difficulty which should remain clean.
With Photoshop Elements.
Take the device of your preference to outline the situation. You will find one of the clipping strategies employing going to one in every one of my previous tutorials (cf. How to transform the white sky into the blue sky? ). I would point out that excellent trimming (hair, twigs, etc.) is now not possible with these 2 software programs. Care should, therefore, be taken now not to pick out a difficulty this is too tough to reduce out.
Save your selection(Selection / Save selection… menu).
Create the brand new layer, mixing mask and blur as formerly explained.
Go to the merged masks and retrieve the selection (Selection / Retrieve selection…).
Take the Paint Bucket device and pick out the black coloration. Click inside the outline.
If the image requires it, you may also want to use the gradient tool again for your fusion mask (which is the case for the example under).
Since there may be a fusion mask, you could add, as mentioned above, make small changes with the brush device.
The Gimp.
Cut out your issueas referred to within the tutorial "How to convert the white sky into the blue sky?" » And store the selection (Menu Selection / Save in a channel).
Create the new layer, blur and layer masks as defined above.
Select the layer mask then cross and find the choice within the channels conversation box (1).Click on the selection masks which you stored earlier (2) then add the selection to the layer mask via clicking at the small red square (3).
The advent of the gradient or the retouching of the blurred or sharp zones is performed as defined formerly.
Also read more,
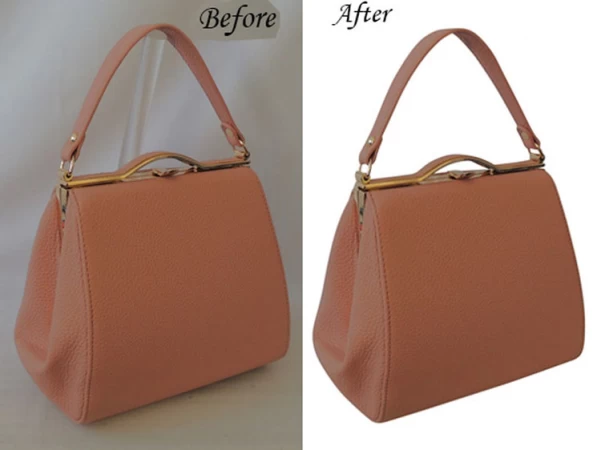
Searching for Cut out pictures from background online administrations?? Clippingphotoindia is giving on the web administrations of cut out picture Background at a sensible cost.